Sunday, March 13, 2011

Boiling Mania

We had a free weekend and I would like to say we chose to boil but with approximately 80 gallons of sap we didn't really have a choice.  We need to get this stuff moving.  Living on a farm and not having an never ending bank account I think it is absolutely eccential.  I wanted to boil using wood this year to save money and for effiency.  It turned out that efficiency was the biggest challange.  We are extemely happy with our collection method.  It is efficient and reliable and best of all CHEAP!  For boiling I planned to use a woodburnng stove that just happened to be laying in our garage with no home.  So Saturday started out with two very large pots on top of the stove in the back yard.  After hours of working at a hot fire and still no hard boil frustrations started to set in.  We kept at it since we already had the fire going but it was very slow going.  By the end of the night we ended up with all of about 1 2/3 cups of syrup.

But sitting there watching the pot boil, literally, I had alot of time to think about how to correct this problem.  I planned up my scheme and got the husband to agree to give assistance the next day to make it happen.  This guy gives me the hardest time about some of these things that I do but he sure does work hard to make it all happen for me!  So today we had to wait until after church and lunch to get things going but the plan was to take off the top of the stove and get a more direct heat to the pots.  This is what our boiling system ended up looking like.


You can see how great of boil we got with this.  I am very pleased.

That is my seat in front of the stove.


I have one word, efficient!  And that is what we needed.  If I wasn't so exhausted my excitement about my ability to set it all up and make it work word come through my post but I am just getting through this post in a daze.  Between constant keeping up with the fire, wood splitting, animal chores, and family duties, and considering it is midnight and I still have a few gallons of sap boiling outside, I am spent!  At the end of two days we have a total of 6 cups of syrup.  Most of which were from today and we only got in a half day of boiling.  So things should move along better now with our "system".

And just for kicks here is this lovely guy I was telling you about.  I think he might  be going a bit looney...lol.


Monday, March 7, 2011

Sap update...and other various ramblings from the farm.

It has been 5 days and we have collected about 60 gallons of sap.  We have pulled out all the stops in containers to keep it all in but so far we have adequate storage.  Between rubermaid totes and all my canning pots we are in good shape.

I also hope to be able to give a photo update on things around the farm now that the ground is not covered in snow.  Though now the snow has turned to mud.  It just doesn't give that cute homesteading farm feeling but it is reality I guess.  I have a 1 year old Louise that is as cute and sweet as ever, a very pregnant Bubbles who is actually sweeter than normal (I think the pregnancy hormones are effecting her).  And some very fluffy horses to show you all.

Chick days are started at the local feed store and I was checking them out.   I am a little tempted to get some of those little fluff balls but this year have decided to hold off until a little later.  May possibly.  Last year I think I got them in March and they were ready so early and with the unpredictable weather we still get in april early may when it was time for them to head out doors it was still too cold.  Oh and we have the turkey tractor situation to figure out.  This is what I want.  Though I am not sure if it will be what I get.  I don't want to spend an arm and a leg but I also don't want to build something cheaply and have to rebuild every year or two.  But this thing would be fabulous.  As long as the weight was doable to be pulled by the 4-wheeler.

Work on the farm is never done and at times it is overwhelming and thoughts of an easier life take over.  But it is a good feeling using your hands to make, grow and raise all you and your family need.  Not that we are there yet but each year we get closer and closer.

Well oh my stars and garters!

Did I hear that correctly?  Are my ears playing tricks on me?  Did my husband just say, "I will plant the garden"?  Don't get me wrong my husband is a wonderful husband and father but in the years I have known him I have seen him spent a total of 5 minutes in the garden all added up and that is the trips he made over the edge to grab cherry tomatoes off the vine.  I have to give him the credit he deserves he is not the every day nitty gritty get involved with out door chores but he IS the nuts and bolts of this operation.  You can see him here  building a cold frame.  Not to mention the animal enclosures and garden boxes he has assembled.  He is muscule that picks up lumber and compost and other various items for all of it.  So it could not be done without him.  But he has never been a willing partner in the planning, planting, harvesting, weeding end of the garden.  Shhhhh I think I may be winning him over to this whole lifestyle ;).  So he offered to plant and no I would not expect him to go out and plant the whole thing by himself but it will be the extra push I needed to get motivated this year and to have a partner to share the load.  It also means that he finds value in all the work that I do.  So much so that he is willing to help me continue it on a year I am struggling to keep up.

Wednesday, March 2, 2011

Lazy woman's bread part 5: bagels.

This recipe is slightly different but the nice thing about making this recipe is that is is good for bagels but you can also use it for any of the other recipes I have posted so far.  So if you ask me, make these couple changes and use this as your stand by.

So for this everything is the same as to how you make the dough except a couple ingredients and amounts.  So you can look back here for the "how to" and use these amounts and ingredient changes.

Ingredients for dough

3 cups luke warm water
1 1/2 T granulated yeast (2 packets)
1 1/2 T kosher salt
1 1/2 T sugar
6 1/4 flour

Prepare dough as I showed you in the first post in this series.  After your dough is done and refridgerated this dough can be used for any of the previous breads along with bagels, soft prezels, bilays.

Depending on how "dense" you want your bagels  you can give them the 20 minute rise time or  form them then immediately boil them.

Boiling-pot
8 quarts boiling water
1/4 cup sugar
1 tsp baking soda
I have halved all this before and it has turned out fine.

Poppy  or sesame seeds optional
extra flour for dusting towel
whole wheat flour for pizza peel (not 100% neccessary)

My first suggestion is to start your water boiling before starting to form your bagels.  That is usally the longest part of the process it waiting for the water to boil.  20 min before baking preheat oven to 450 degrees.  If you have a pizza peel you can put your stone in the oven before preheating.

Dust your dough with a little flour and pull off a piece of dough about 3 oz or the size of a small peach.  Form the same as all the other recipes.  Rolling your hands down and under to make the top to the "ball" smooth rotating as you go, blah blah, you know the drill.  Repeat and form the rest of your bagels.  Cover them loosely with plastic wrap or dont' and let rest for 20 minutes.  Honestly this isn't rocket science and there is nothing to be intimidated about. It is hard to mess up and even if it isn't salvagable it costs so little it is not like much is lost.   Go for it!


Here are my bagel balls!  How you like em?  I'd have to say though that these were a bit bigger than a small peach and they made, well, large bagels.


Once your water is boiling punch your thumb through the center of the ball and stretch the center of the bagel hole is about triple width of the bagel wall.

There are alot of different ways you can get the desired shape. You can do a little spin on the finger.


Or pull it apart and try to fit your head through it.


But the idea is to have fun in your kitchen act like a complete fool and get about this kind of result.


Drop the bagels into the boiling water one at a time making sure not to crowd them.  They need enough room to float.  Simmer for 2 minutes, flip and boil one more minute.


Dust a towel with flour, sound weird?  It kinda is, just do it :)


 and place the them on the towel.


  At this point you can sprinkle them with seeds if you like or not if you don't have them. 

I got me a pizza peel!  Do you need one?  NO.  I have been doing this for over a year without one but it was a little indulgent on my part.  I wanted one!


 There they are ready to bake for 20 minutes.
Put the bagels in the preheated oven for 20 minutes or until brown.  You will love these!  They store great so you can make them for now or later or both!


For breakfast egg and sausage bagel!

Or with chicken salad for lunch!

Remember how I said these were big?  That is why you see them halved in these pics.  Unless you are a lumberjack half was plenty!

Or you can go simple with these yummy bagels and just a little cream cheese.  I dare yo to just eat one bite!  It ain't gonna happen!

Tree tapping day!


I wasn't sure if we were going to get to it this year because we have been extra busy.  But this winter has been mean, harsh and nasty BUT it has been a fantastic year for sap so the tapping weather stuck around long enough for me to get to it!  Last night was the night.  I was determined to do it this week because the entire week should be lovely for good sap flow. 

Last year we only tapped two trees to try it.  This year we decided to do all 6.  So after a quick trip to the Amish farm store around the corner to get taps and tubing we were set to tap.  We were trying to be resourceful and find the cheapest way to collect.  Last year we had a tubing system which worked well but was more costly than we would like.  Not that we consider this a money saving venture but we also don't want to spend a bunch of money on it.  This year we used a combination of milk jugs, tubing and rubermaid containers.  Pretty much what we had on hand other than the taps and a little tubing.  Bottom line is you don't need any fancy equimpent if you ever want to try it yourself.  If you have a milk jug, a little tubing and some twine you can pull this off.  It can be a fun learning experience!  Or you can read about me doing it and make me do all the work and you can follow along in the process.  Also taps are cheap I bought some online last year for $2.50 but this year I found them here locally for plastic one they were only $.52.

It was a fairly quick process except when my dear husband got a bit zealous and broke the bit off in the tree.  So a quick trip to Lowes and we finished just before dark with the first 4 trees at least since I needed some time to come up with a few more collection methods.


Here is the over zealous husband and our crazy little helpers!


Milk jug metal taps and tubing, method.


We came up with this last year.  It is a combination of tubes and connectors all going in to one 5 gallon bucket.  It works ok but the jugs are a bit better and less cost and less complicated.

These are the milk jugs and plastic taps.  The plastic taps are made to fit that blue tubing so it all fits great and easy to put together.


I got to last two today.  I invited a friend and her kids to come over and take part in it.  Here is me and my wild monkey "helpers".


Here is a closer look at the platic taps, tubing and milk jug assembly.


 This is the last tree.  Here we had some tubing and a rubermaid container so I drilled 3 holes in the top for the tubes and just connected it all.


If you look close you can see the sap line.  This was only 20 minutes after tapping.

This morning we woke up to some gallon jugs over flowing and others almost full!  For a total of 9 gallons in about 12 hours!  And that is only the four.  So we are adding two more to that today.  So after 7 days of collecting 20 gallons a day we should end up with 140 gallons!  That is fantastic except when it comes to the fact that we are not adequately prepared to store 140 gallons of liquid.  So we get to practice our resourcefulness again and come up with something.  The cool thing is sap to syrup is about 40-1 so 140/40 we are talking over 3 gallons of syrup!!!  That is awesome!  We shall see how the week goes and I will try to update you on collection numbers.

Lastly our resourcefulness will be tried again when it comes time to boil.  I have a feeling there will not be a whole lot of sleeping going on for a couple days.  But I am going to see if there is interest in a boiling party with some friends of ours and at least it would be fun times!

My hopes are to continue this series with the rest of the sugaring (that is what it is called by the "real" syrup people,though I don't know how much sense it makes) process along with some of the technicality of tree tapping.

Tuesday, March 1, 2011

Lazy woman's bread part 4: Batard

So far we have eaten 4 pizzas, two loaves of bouhl and the last thing out of that batch we had were Batard.  These are great for individual loaves for sandwiches or whatever.

The nice thing about artisan bread is that once you get these few steps down almost all of the variations start out the same.  Preheat your oven to 450 degrees.  And similar to the other breads we have done you sprinkle the top of your dough with flour and take off a hunk of dough.  This time about the size a a large peach.  Roll it down and under with your hands forming it into a ball.   I formed 6 of these for our dinner of Italian beef. 

Then you can practice your playdough snake making skills.   Really, just roll them in your hands that same way . Sprinkle your stone with corn meal and let them rise for 20 minutes.


 Just before baking sprinkle the top of your mini loaves with flour and take a sharp knife and cut about 1/4 of the way through each loaf.

 I do about 3 slits each and this is what they look like pre-baking.

 After approximately 20 minutes they will look something like this.


And when you serve up these mini loaves with this or just about anything you will get rave reviews.  I promise.


Cake truffles

These are also featured over at Sweet as Sugar Cookies in her sweet treat linky party.

These little dessert treats will make you look like the gourmet cook in all of us.  When in reality they are as easy as can be and you won't believe how delicious they are!

It may not seem this way but I really am not a baker and rarely do but with most everything I do I cannot just make a cake and slap on icing.  Why?  Will it taste the same?  Yes.  But I cannot settle for just one aspect of the process.  I not only love funtionality but beauty in the practical is what I love.  So it is actually hard for me to bake cupcakes and slap on icing for childrens treats because I just don't see the beauty in it but when I stumbled upon these beauties in a bakery I just had to find out what they were.  Because the look of them caught my eye enough to get me to purchase one for $3.99 but when I ate it...oh mmm.  My curiousity wouldn't rest until  I found out what it was I was eating.  They were called cake truffles.  What I found was they are incredibly simple.  So here it is in a nut shell. 

Today I made "Turtle Cake Truffles" to celebrate my husbands 32nd birthday.  But last week they were "Chocolate Covered Cherry Truffles" for my daughters 6th birthday.  The combinations are endless. 
What you will need:  Cake mix of your choice, container of icing your choice, chocolate for melting and any other extras you want to add.  Here I also used carmels and pecans.

Step 1: Make the boxed cake mix as directed,

OR enlist any helpers from the 4 ft and under crowd to do it for you.


The you have a perfectly good cake.  Slap on some icing and done!  Ha, nope I said simple but it is not that easy.  You take that perfectly good cake and....

demolish it!  Cut it into peices while it is still warm.  Not need to worry about keeping it pretty.

Then take a container of frosting.  I used caramel.  (It did not auto rotate so it is sideways icing)

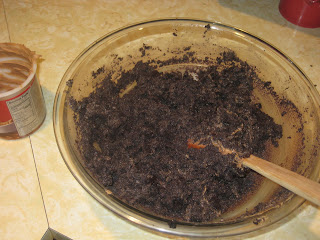
Dump the cake and the icing into a large bowl.  I know it may seem weird but stick with me here.

Mix it all together until it is all well incorperated.  No need to over mix.

I said it was simple but I didn't say you wouldn't get really messy!  Now you need to form balls.  I do 1 1/2-2 inch balls.  They will be kind of rough at first but if you let them set for a couple minutes and clean your hands you can reroll them and they will be more shapely.

Let them cool.  I would suggest putting them in the freezer for about 20 min before dipping in chocolate.
During this phase you could also get a little fun and add suprises in the middle.  EX: chocolate covered cherry, chocolate cake, cherry icing and put a marcino cherry in the center of the ball.  Or Turtle, you can put a whole pecan or caramel in the center.

Some people use dutch ovens, I improvise.  This is my set up to melt the chocolate.


Drop in the balls...

Cover them thoroughly and quickly.


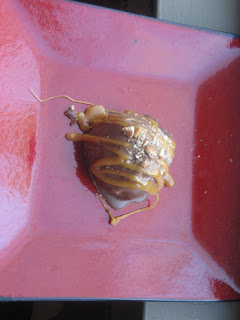
The last couple steps I failed to get photos of because my hands were full.  I just used the same method to melt the carmel as I did the chocolate.  Drizzled the balls with the caramel and quickly sprinkle with toasted pecans.   And here is your finished product!


And they taste amazing!  Like a super moist, dense, rich cake, covered in chocolate.  What is not to love?!

Happy Birthday Love!